Autocad Can T Change Draw Order
Every design firm has a library collection of blocks, as they are an important component of every AutoCAD drawing. Blocks are essential because they can help keep file sizes down, allow consistency in you project drawings and allow tracking of block data by using attributes; information such as manufacturer, product numbers etc.
This all translates to productivity, speed and consistency in your work.
So how do you take this library of blocks and efficiently use it in AutoCAD?
This article will explain and take you through the steps of the AutoCAD Design Center, how to create new tool palettes and add your blocks, organizing Tool Palettes, customize block properties, sharing Tool Palettes on a network, and changing the path of a source file.
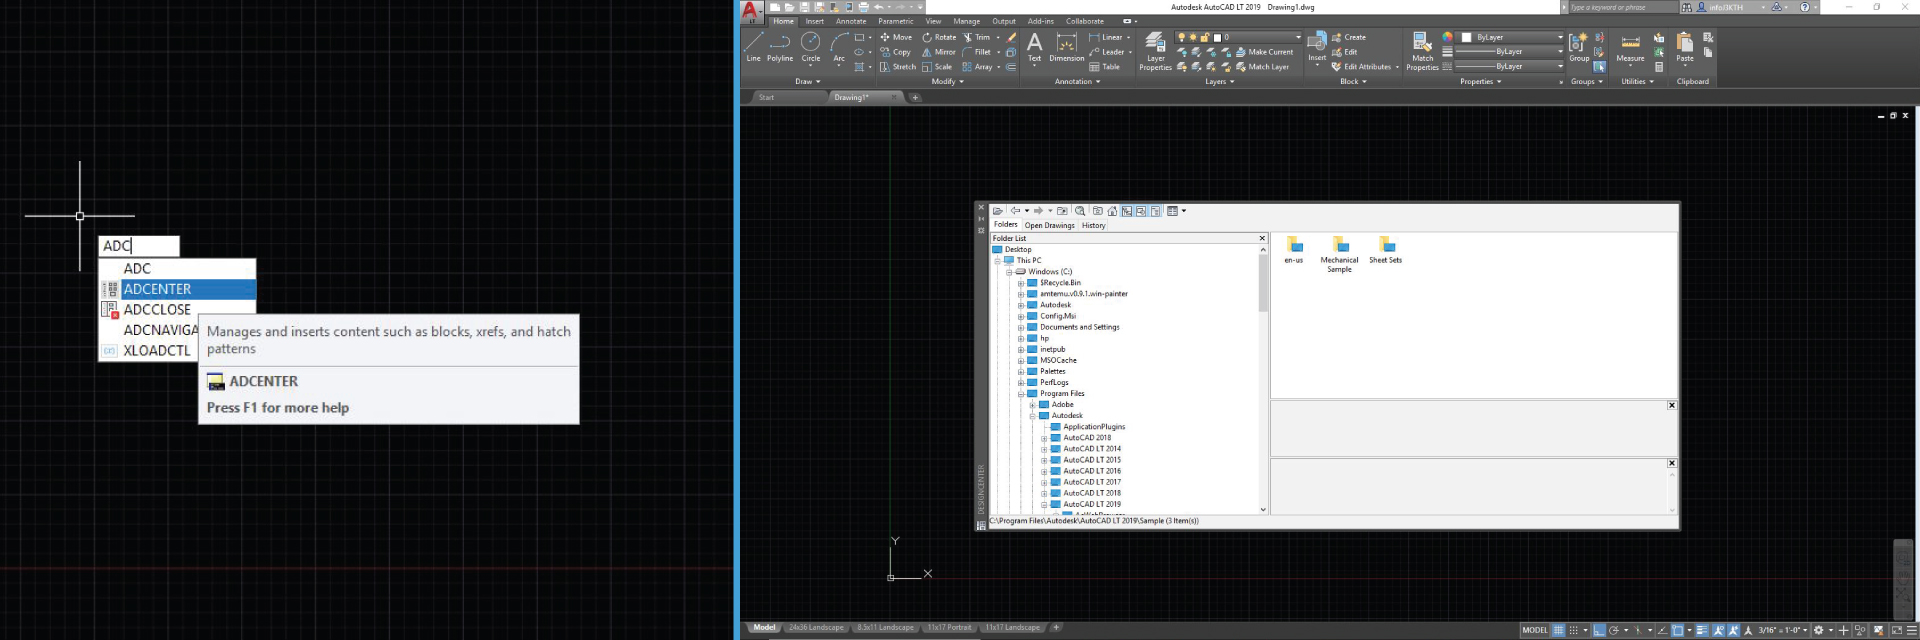
DESIGN CENTER
The Design Center organizes access to drawing content and allows you to browse sources.
Note: Press Ctrl+2 or command ADC to open the Design Center.
TOOL PALETTES
The main objective is to produce accurate, precise drawings and models as quickly and efficiently as possible. AutoCAD Tool Palettes put your commonly used blocks at your fingertips. They are easy to create, organize, customize and share. Instead of endless searching, you can create palettes and palette groups for each set of blocks.
ADDING YOUR BLOCKS TO TOOL PALETTES
Step 1: Download or create a file with your blocks.
Step 2: Move file to a folder dedicated only for your blocks.
Note: we recommend using one location for all your future blocks (i.e. : C:\PALETTES).
Step 3: Open a new drawing.
Step 4: Activate Tool Palette: press Ctrl+3 or type command TOOLPALETTES if the tool palette window is not already visible.
Note: The Tool Palette will bring all the default AutoCAD palettes. You can organize your palettes to your preference.
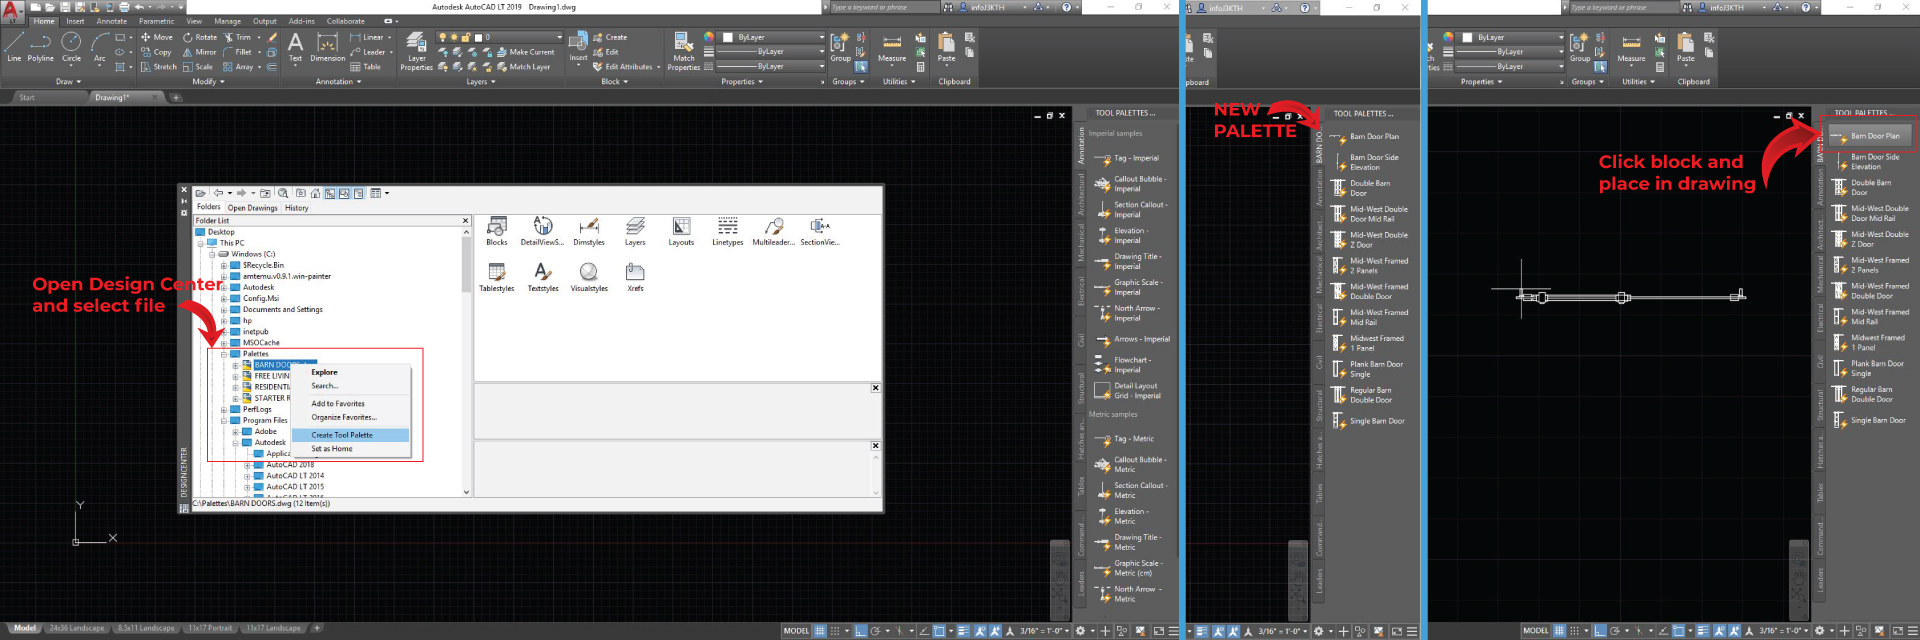
Step 5: Press Ctrl+2 or command ADC to open the Design Center.
Step 6: In the Folder List, find your saved Dynamic Block File. Right Click on the file, and select Create Tool Palette. A new tab with the name of your file will be added to your Tool Palette.
Start using your blocks! Simply click on the desired block to insert into the drawing.
Note: when adding a Dynamic Block it will be distinguished with a lighting bolt symbol.
ORGANIZING YOUR TOOL PALETTES
Tool Palettes have the ability to be customized, and it is simple to do so.
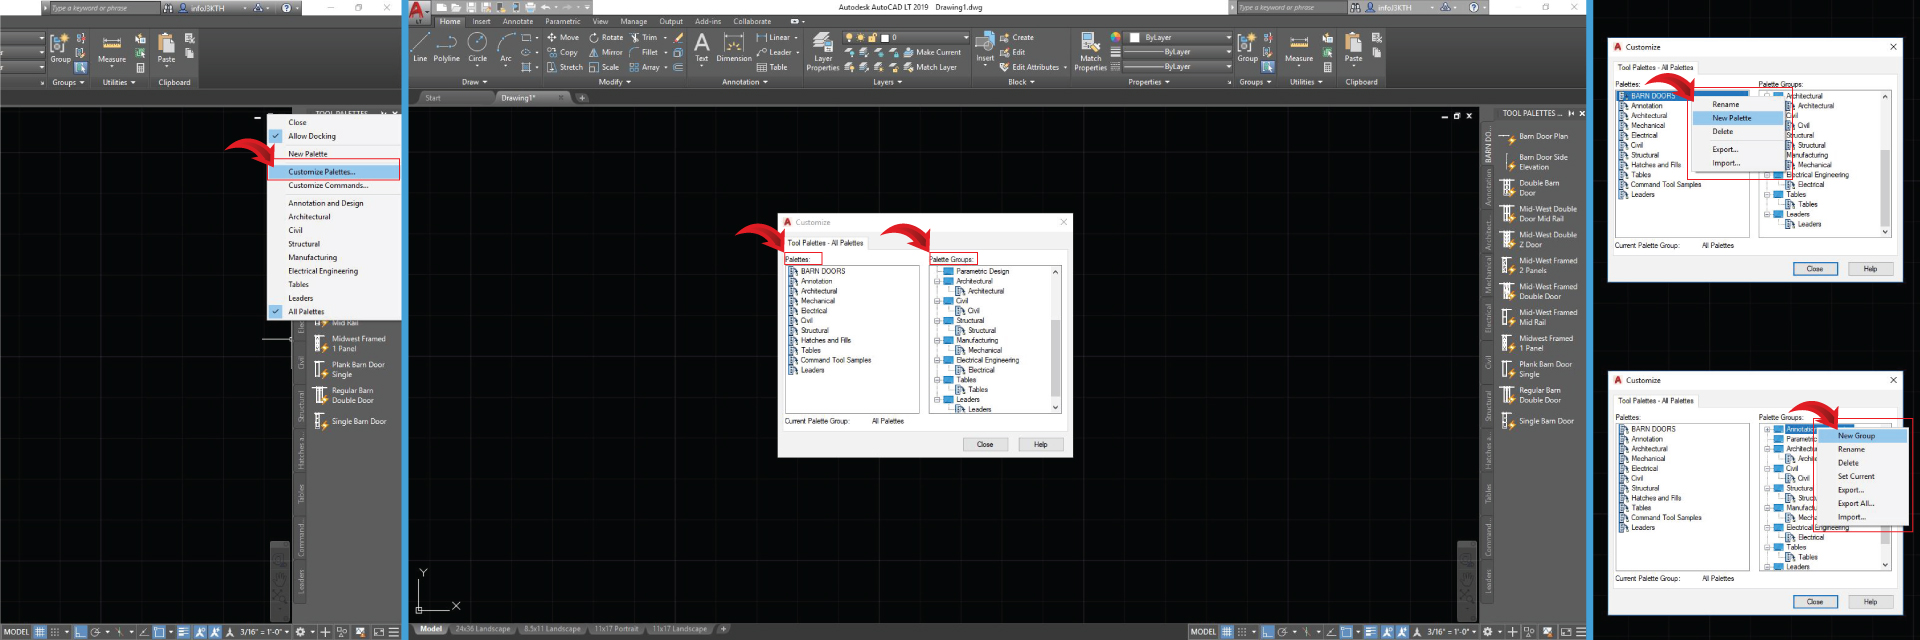
Step 1: Right Click the grey title bar on the side of the palette and select Customize Palettes. A dialog box will open that gives you areas for adding new groups and palettes.
Step 2: Right click on the Palettes column to select New Palette or right click on the Palette Groups to add new groups. Drag/drop from Palettes in the left pane to Palette Groups on the right pane.
Once you create different groups you can switch between them by right clicking on the grey title bar of the Tool Palettes. Your Groups will appear at the bottom.
Note: You can also create sub-categories under a specific Group.
CUSTOMIZING PROPERTIES OF BLOCKS
In a dynamic block there can be more than one view of an object, such as a plan or elevation. When you have a block to a palette you can see an image of the block. This default image can be changed if you prefer to see a different view. For instance if you have a chair you may prefer seeing the elevation rather than the plan so that it is easier to recognize the style.
You can change the block icon on the Tool Palette by following these steps:
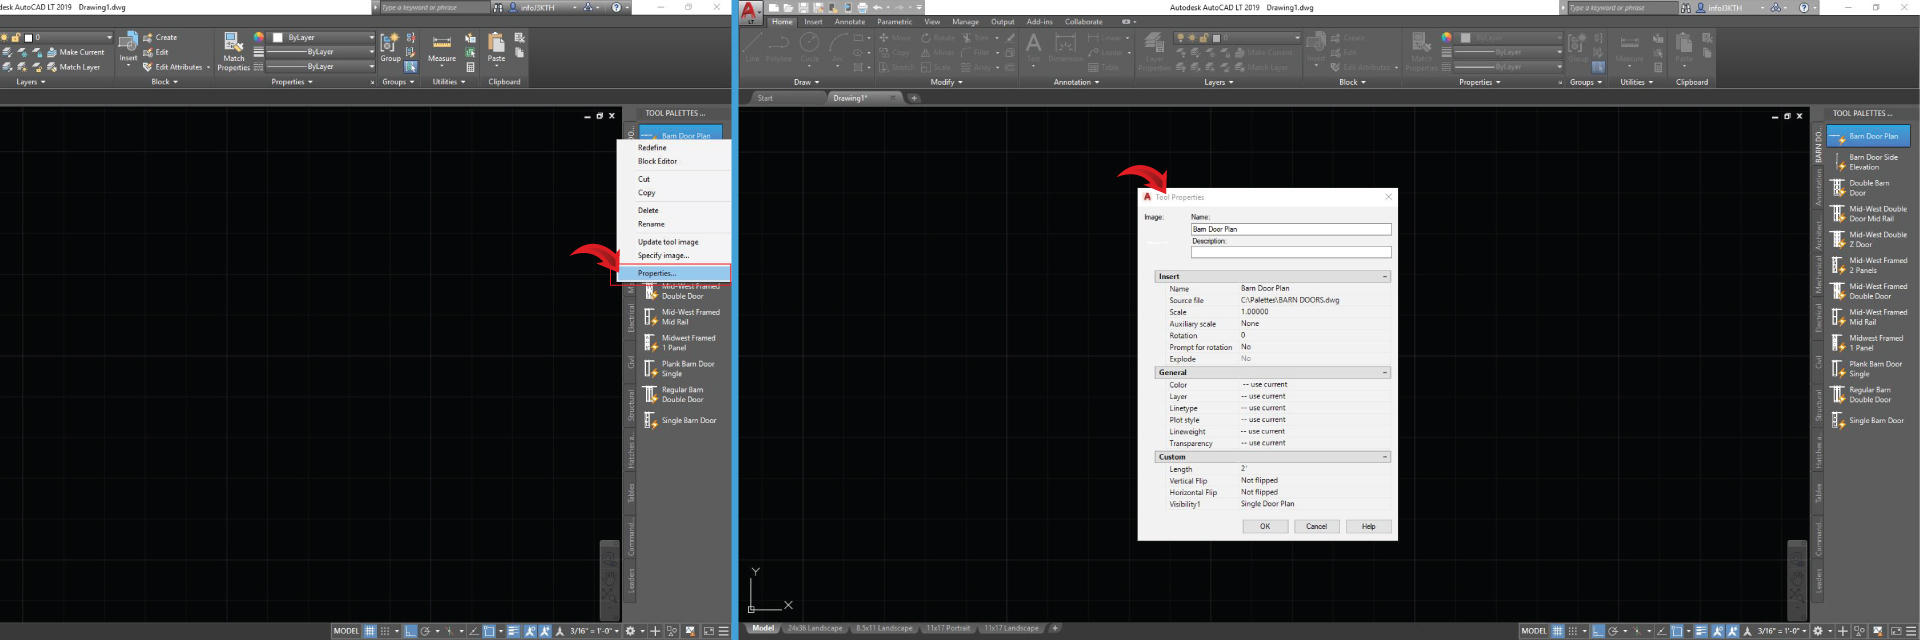
Step 1: Right-click a block and select Specify Image.
Step 2: In the Select Image file dialog box, locate and select the image file you want use.
Step 3: Click Open to assign the new image.
You can further customize the properties of each block such as color, layer, linetype, plot style, etc.
Step 1: Right click on the desired block in the Tool Palette and select Properties.
Step 2: Change all the properties as desired.
Why is this important? For example you have a block that you want to always use on a specific layer. By changing the Layer property to always insert on that layer, you speed up your process and make sure you don't forget to change the layer further down the road.
SHARING TOOL PALETTES ON A NETWORK
Sharing Tool Palettes in an office is a great way to share standards, however the process can be a little intimidating. While AutoCAD makes it easy to actually export and import a Tool Palette, there are several other settings you need to take into consideration when you set this up.
This is why setting up a network location where the entire office has access to has proven to be the most efficient way. Storing them in a single location will make sure that everyone is using the exact same palettes which can make drawing and documentation much easier.
Step 1: Create one or more folders on the network titled Shares Tool Palettes. If you have one person designated to being in charge of the Tool Palettes, make sure you set the folder as Read-Only access for common users. That way, they are not able to change the palettes easily, and disrupt your standards.
Note: For starters you can copy the entire Tool Palette folder in the default AutoCAD folder to your new location. Copy, do NOT delete or cut. You can find where your tool palettes are located by going to the TOOLS > OPTIONS function and looking at the Tool Palette Files Location path as shown above. Use the Browse button to change that path to the shared network location you want everyone to use.
Step 2: Make sure the blocks that appear in your tool palettes are also saved in one shared folder over the network. If the blocks are moved, then the palette will be rendered useless unless you manually go into each palette and remap the location of the source files. This can be really tedious.
TIP: You can add multiple Tool Palette locations on each computer and set the shared location as the default one. That way each computer can set additional Tool Palettes custom for themselves.
Step 3: Once the Tool Palette folders are made, create the actual palettes using the network locations. You should now be able to use the Tool Palettes over a network.
NOTE: avoid copying tool palette files between different AutoCAD versions. Things do not always go smooth.
CHANGING THE PATH OF A SOURCE FILE
Sometimes you simply want to transfer your palettes to a new computer and not use them on a shared network. In order to use Tool Palettes on another computer, you need to ensure that the original drawing containing blocks is also transferred to the same file location. In the event the path of the saved drawing is incorrect, you may need to update the file path. You can do that by following these steps:
Step 1: Activate the Tool Palettes by pressing CTRL+3 and import them as explained in the steps above.
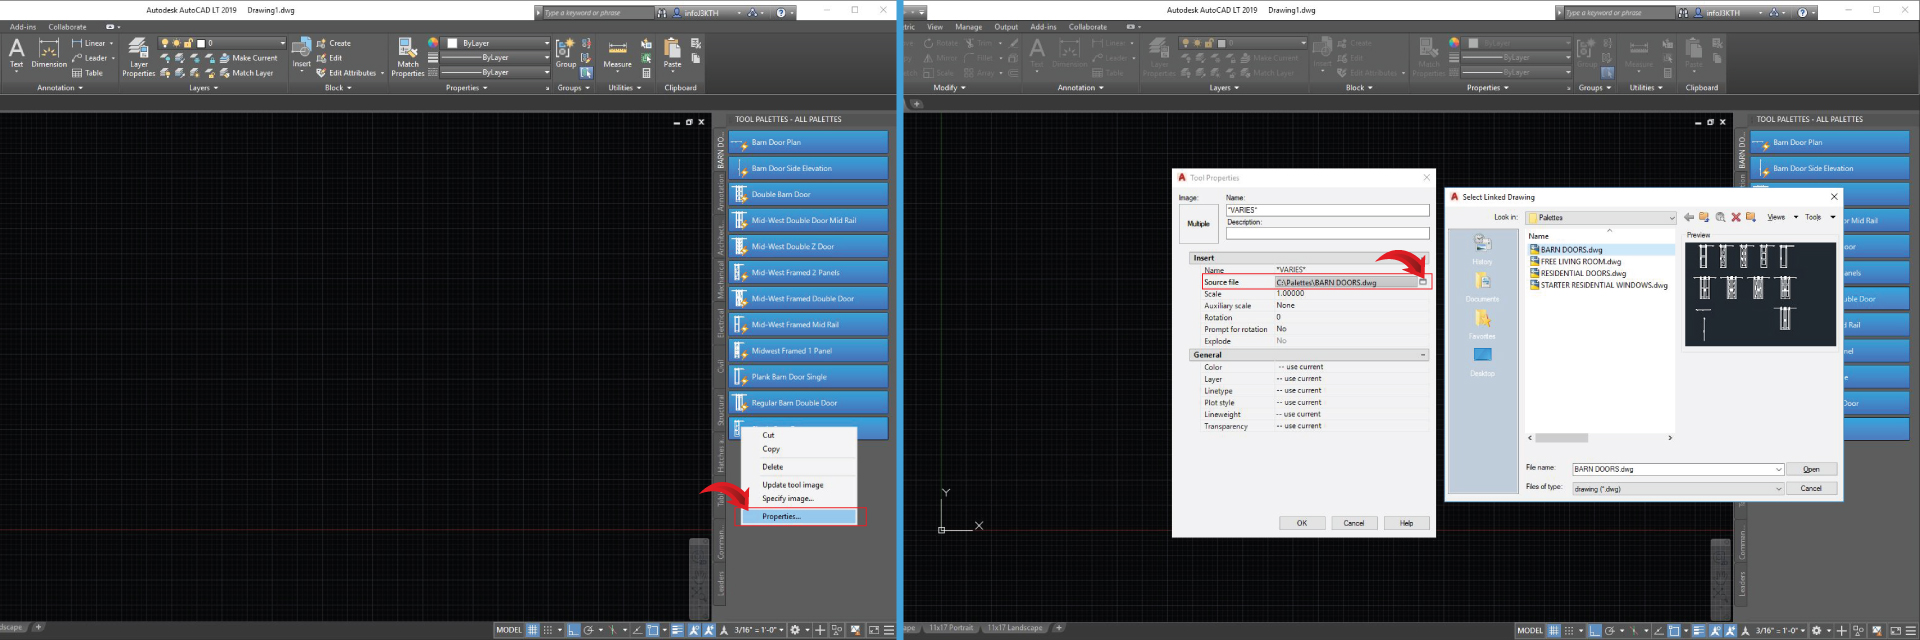
Step 2: Then select all blocks in the Palette by pressing the SHIFT key and then right-click and select Properties. A new Tool Properties window will appear, under Insert you will find Source File that has the file link.
Step 3: Click on the Select Linked Drawing icon to the right of the Source File link, a new window will pop up. Locate and click on the correct block file and select Open.
The new file path is now updated for all blocks in the palettes.
Reader Interactions
Source: https://letitunfold.ca/2019/01/30/manage-your-autocad-blocks-create-customize-and-share-tool-palettes/
0 Response to "Autocad Can T Change Draw Order"
Post a Comment